并发 -《Go In Action》-Ch6

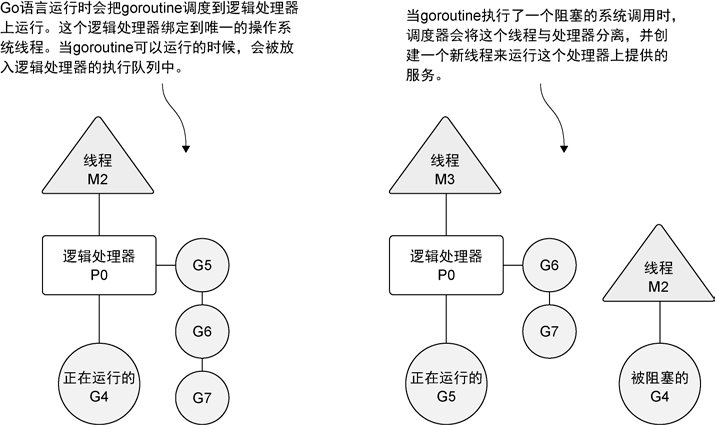
每个goroutine是一个独立的工作单元,这个单元会被调度到可用的逻辑处理器上执行。Go运行时通过调度器管理goroutine,为其分配执行时间。
调度器在操作系统之上,将操作系统的线程和语言运行时的逻辑处理器绑定,并在逻辑处理器上运行goroutine。
Go语言通过在goroutine之间传递数据来通信,而不是对数据加锁来实现同步访问。
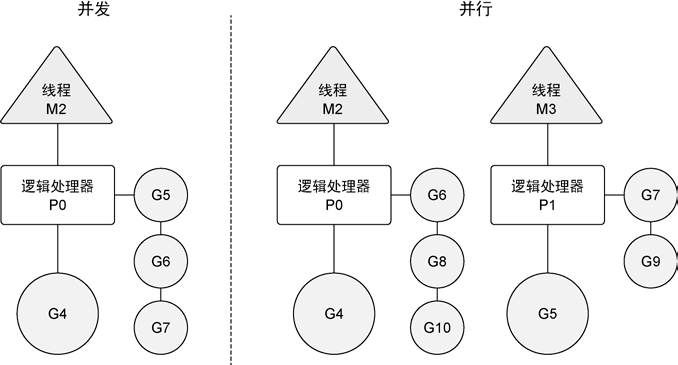
6.1 并行和并发

Go调度器如何管理goroutine

并发是让不同的代码片段同时在不同的物理处理器上执行,并发是指同时管理很多事情。
每当创建一个goroutine并准备运行,goroutine被分配到调度器的全局队列中,调度器会给goroutine分配一个逻辑处理器,将goroutine放到逻辑处理器对应的本地队列中。

并发和并行的区别

6.2 goroutine

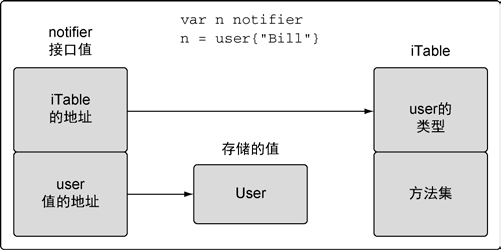
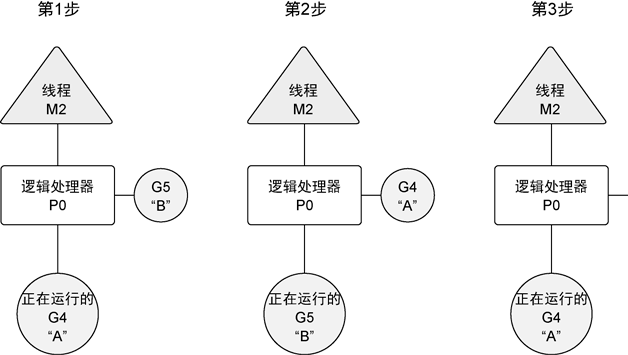
下面这个程序展示了逻辑处理器是如何调度goroutine的,runtime.GOMAXPROCS(1)只允许程序使用一个逻辑处理器。

1
2
3
4
5
6
7
8
9
10
11
12
13
14
15
16
17
18
19
20
21
22
23
24
25
26
27
28
29
30
31
32
33
34
35
36
37
38
39
40
41
42
43
44
45
46
47
48
49
50
51
52
53
54
55
56
57
58
59
60
61
62
63
64
65
66
67
68
69
70
71
72
package main

import (
"fmt"
"runtime"
"sync"
)

// wg is used to wait for the program to finish.
var wg sync.WaitGroup

// main is the entry point for all Go programs.
func main() {
// Allocate 1 logical processors for the scheduler to use.
runtime.GOMAXPROCS(1)

// Add a count of two, one for each goroutine.
wg.Add(2)

// Create two goroutines.
fmt.Println("Create Goroutines")
go printPrime("A")
go printPrime("B")

// Wait for the goroutines to finish.
fmt.Println("Waiting To Finish")
wg.Wait()

fmt.Println("Terminating Program")
}

// printPrime displays prime numbers for the first 5000 numbers.
func printPrime(prefix string) {
// Schedule the call to Done to tell main we are done.
defer wg.Done()

next:
for outer := 2; outer < 5000; outer++ {
for inner := 2; inner < outer; inner++ {
if outer%inner == 0 {
continue next
}
}
fmt.Printf("%s:%d\n", prefix, outer)
}
fmt.Println("Completed", prefix)
}

// output
// Create Goroutines
// Waiting To Finish
// B:2
// B:3
// ...
// B:4583
// B:4591
// A:3 ** 切换 goroutine
// A:5
// ...
// A:4561
// A:4567
// B:4603 ** 切换 goroutine
// B:4621
// ...
// Completed B
// A:4457 ** 切换 goroutine
// A:4463
// ...
// A:4993
// A:4999
// Completed A
// Terminating Program

可以看到goroutine A和B是交替运行的,因为只有一个逻辑处理器。调度过程可以用下图表示:

逻辑处理器调度goroutine

6.3 竞争状态

多个goroutine同时对一个共享资源进行读和写,容易进入相互竞争的状态

1
2
3
4
5
6
7
8
9
10
11
12
13
14
15
16
17
18
19
20
21
22
23
24
25
26
27
28
29
30
31
32
33
34
35
36
37
38
39
40
41
42
43
44
45
46
47
48
49
package main

import (
"fmt"
"runtime"
"sync"
)

var (
// counter is a variable incremented by all goroutines.
counter int

// wg is used to wait for the program to finish.
wg sync.WaitGroup
)

// main is the entry point for all Go programs.
func main() {
// Add a count of two, one for each goroutine.
wg.Add(2)

// Create two goroutines.
go incCounter(1)
go incCounter(2)

// Wait for the goroutines to finish.
wg.Wait()
fmt.Println("Final Counter:", counter)
}

// incCounter increments the package level counter variable.
func incCounter(id int) {
// Schedule the call to Done to tell main we are done.
defer wg.Done()

for count := 0; count < 2; count++ {
// Capture the value of Counter.
value := counter

// Yield the thread and be placed back in queue.
runtime.Gosched()

// Increment our local value of Counter.
value++

// Store the value back into Counter.
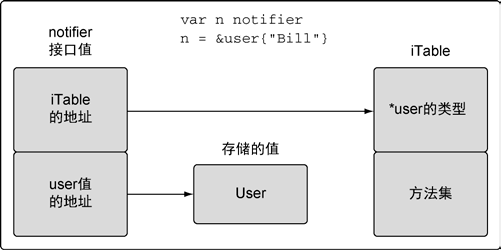
counter = value
}
}

最后counter的值有可能是2,可以用下面这个图描述下过程

竞争状态下程序行为的图像表达

可以用go build -race检测代码里的竞争状态

1
2
3
4
5
6
7
8
9
10
11
12
13
14
15
16
17
18
19
go build -race // 用竞争检测器标志来编译程序
./example // 运行程序
==================
WARNING: DATA RACE
Write by goroutine 5:
main.incCounter()
/example/main.go:49 +0x96
Previous read by goroutine 6:
main.incCounter()
/example/main.go:40 +0x66
Goroutine 5 (running) created at:
main.main()
/example/main.go:25 +0x5c
Goroutine 6 (running) created at:
main.main()
/example/main.go:26 +0x73
==================
Final Counter: 2
Found 1 data race(s)

6.4 锁住共享资源

可以使用原子函数和互斥锁解决共享资源的问题

6.4.1 原子函数

原子函数能够以很底层的加锁机制来同步访问整形变量和指针,atomic包提供了一些原子操作,如AddInt64,这个函数会同步整型类型的的加法
LoadInt64和StoreInt64,这两个函数提供了一种安全的读写一个整型值的方式。

1
2
3
4
var count int64
atomic.AddInt64(&counter, 1)
atomic.LoadInt64(&cunter)
atomic.StoreInt64(&count, 1)

6.4.2 互斥锁

互斥锁用于在代码上创建一个临界区,保证同一时间只有一个goroutine 可以执行这个临界区代码

1
2
3
4
mutex sync.Mutex
mutex.Lock()
...
mutex.Unlock()

6.5 通道

可以使用make来创建通道

1
2
3
4
5
6
7
8
9
// 无缓冲的整型通道
unbuffered := make(chan int)
// 有缓冲的字符串通道
buffered := make(chan string, 10)

// 向通道发送值
buffered <- "Gopher"
// 从通道里接收值
value := <-buffered

无缓冲的通道(unbuffered channel)是指在接收前没有能力保存任何值的通道。这种类型的通
道要求发送goroutine 和接收goroutine 同时准备好,才能完成发送和接收操作。如果两个goroutine
没有同时准备好,通道会导致先执行发送或接收操作的goroutine 阻塞等待。这种对通道进行发送
和接收的交互行为本身就是同步的。其中任意一个操作都无法离开另一个操作单独存在。

1
2
3
4
5
6
7
8
9
10
11
12
13
14
15
16
17
18
19
20
21
22
23
24
25
26
27
28
29
30
31
32
33
34
35
36
37
38
39
40
41
42
43
44
45
46
47
48
49
50
51
52
53
54
55
56
57
58
59
60
61
62
63
64
65
// This sample program demonstrates how to use an unbuffered
// channel to simulate a relay race between four goroutines.
package main

import (
"fmt"
"sync"
"time"
)

// wg is used to wait for the program to finish.
var wg sync.WaitGroup

// main is the entry point for all Go programs.
func main() {
// Create an unbuffered channel.
baton := make(chan int)

// Add a count of one for the last runner.
wg.Add(1)

// First runner to his mark.
go Runner(baton)

// Start the race.
baton <- 1

// Wait for the race to finish.
wg.Wait()
}

// Runner simulates a person running in the relay race.
func Runner(baton chan int) {
var newRunner int

// Wait to receive the baton.
runner := <-baton

// Start running around the track.
fmt.Printf("Runner %d Running With Baton\n", runner)

// New runner to the line.
if runner != 4 {
newRunner = runner + 1
fmt.Printf("Runner %d To The Line\n", newRunner)
go Runner(baton)
}

// Running around the track.
time.Sleep(100 * time.Millisecond)

// Is the race over.
if runner == 4 {
fmt.Printf("Runner %d Finished, Race Over\n", runner)
wg.Done()
return
}

// Exchange the baton for the next runner.
fmt.Printf("Runner %d Exchange With Runner %d\n",
runner,
newRunner)

baton <- newRunner
}

有缓冲的通道(buffered channel)是一种在被接收前能存储一个或者多个值的通道。这种类
型的通道并不强制要求goroutine 之间必须同时完成发送和接收。通道会阻塞发送和接收动作的
条件也会不同。只有在通道中没有要接收的值时,接收动作才会阻塞。只有在通道没有可用缓冲
区容纳被发送的值时,发送动作才会阻塞。这导致有缓冲的通道和无缓冲的通道之间的一个很大
的不同:无缓冲的通道保证进行发送和接收的goroutine 会在同一时间进行数据交换;有缓冲的
通道没有这种保证。

1
2
3
4
5
6
7
8
9
10
11
12
13
14
15
16
17
18
19
20
21
22
23
24
25
26
27
28
29
30
31
32
33
34
35
36
37
38
39
40
41
42
43
44
45
46
47
48
49
50
51
52
53
54
55
56
57
58
59
60
61
62
63
64
65
66
67
68
69
70
71
72
73
74
75
76
77
// This sample program demonstrates how to use a buffered
// channel to work on multiple tasks with a predefined number
// of goroutines.
package main

import (
"fmt"
"math/rand"
"sync"
"time"
)

const (
numberGoroutines = 4 // Number of goroutines to use.
taskLoad = 10 // Amount of work to process.
)

// wg is used to wait for the program to finish.
var wg sync.WaitGroup

// init is called to initialize the package by the
// Go runtime prior to any other code being executed.
func init() {
// Seed the random number generator.
rand.Seed(time.Now().Unix())
}

// main is the entry point for all Go programs.
func main() {
// Create a buffered channel to manage the task load.
tasks := make(chan string, taskLoad)

// Launch goroutines to handle the work.
wg.Add(numberGoroutines)
for gr := 1; gr <= numberGoroutines; gr++ {
go worker(tasks, gr)
}

// Add a bunch of work to get done.
for post := 1; post <= taskLoad; post++ {
tasks <- fmt.Sprintf("Task : %d", post)
}

// Close the channel so the goroutines will quit
// when all the work is done.
close(tasks)

// Wait for all the work to get done.
wg.Wait()
}

// worker is launched as a goroutine to process work from
// the buffered channel.
func worker(tasks chan string, worker int) {
// Report that we just returned.
defer wg.Done()

for {
// Wait for work to be assigned.
task, ok := <-tasks
if !ok {
// This means the channel is empty and closed.
fmt.Printf("Worker: %d : Shutting Down\n", worker)
return
}

// Display we are starting the work.
fmt.Printf("Worker: %d : Started %s\n", worker, task)

// Randomly wait to simulate work time.
sleep := rand.Int63n(100)
time.Sleep(time.Duration(sleep) * time.Millisecond)

// Display we finished the work.
fmt.Printf("Worker: %d : Completed %s\n", worker, task)
}
}

上面代码需要注意的是close(tasks),关闭通道后,goroutine依旧可以从通道接收数据,但是不能再向通道里发送数据。

6.6 小结

并发是指goroutine运行的时候是相互独立的
使用关键字go创建goroutine来运行函数
goroutine在逻辑处理器上执行,逻辑处理器具有独立的系统线程和运行队列
竞争状态是指两个或者多个goroutine试图访问同一个资源
原子函数和互斥锁提供了一种防止出现竞争状态的办法
通道提供了一种在两个goroutine之间共享数据的简单方法
无缓冲的通道保证同时交换数据,而有缓冲的通道不做这种保证

Go语言的类型系统 -《Go In Action》-Ch5

Go语言是一种静态类型的编程语言,编译器需要在编译时知道每个值的类型

5.1 用户定义类型

声明一个新类型,即告诉编译器类型需要的内存大小和表示信息。

1
2
3
4
5
6
7
8
9
10
11
12
13
14
15
16
17
18
19
20
21
22
23
24
25
26
27
28
29
30
31
32
33
34
35
36
37
38
39
40
41
42
43
44
45
46
47
48
49
50
51
52
53
54
55
// 第一种声明方式
type user struct {
name string
email string
}

// 使用结构类型声明变量,并初始化为其零值
// 声明user 类型的变量
var bill user

// 使用结构字面量来声明一个结构类型的变量
// 声明user 类型的变量,并初始化所有字段
lisa := user{
name: "Lisa",
email: "lisa@email.com",
ext: 123,
privileged: true,
}

// 不使用字段名,创建结构类型的值
// 声明user 类型的变量
lisa := user{"Lisa", "lisa@email.com", 123, true}

// 使用其他结构类型声明字段
// admin 需要一个user 类型作为管理者,并附加权限
type admin struct {
person user
level string
}

// 使用结构字面量来创建字段的值
// 声明admin 类型的变量
fred := admin{
person: user{
name: "Lisa",
email: "lisa@email.com",
ext: 123,
privileged: true,
},
level: "super",
}

// 第二种声明方式
// 基于int64 声明一个新类型
// int64 和 Duration 是两种不同的类型,int64是Duration的基础类型,试图对ini64和Duration相互赋值将产生编译错误
package main
type Duration int64

func main() {
var dur Duration
dur = int64(1000)
}

// prog.go:7: cannot use int64(1000) (type int64) as type Duration
// in assignment

5.2 方法

方法能给用户定义的类型添加新的行为,方法实际上也是函数,只是在声明时,在关键字func和方法名之间的增加了一个参数,
这个参数被称为接收者,将函数和接收者的类型绑在一起。

1
2
3
4
5
6
7
8
9
10
11
12
13
14
15
16
17
18
19
20
21
22
23
24
25
26
27
28
29
30
31
32
33
34
35
36
37
38
39
40
41
42
// 这个示例程序展示如何声明
// 并使用方法
package main

import (
"fmt"
)

// user 在程序里定义一个用户类型
type user struct {
name string
email string
}

// notify 使用值接收者实现了一个方法
func (u user) notify() {
fmt.Printf("Sending User Email To %s<%s>\n",
u.name,
u.email)
}

// changeEmail 使用指针接收者实现了一个方法
func (u *user) changeEmail(email string) {
u.email = email
}

// main 是应用程序的入口
func main() {
// user 类型的值可以用来调用
// 使用值接收者声明的方法
bill := user{"Bill", "bill@email.com"}
bill.notify()

// 指向user 类型值的指针也可以用来调用
// 使用值接收者声明的方法
lisa := &user{"Lisa", "lisa@email.com"}
lisa.notify()

// user 类型的值可以用来调用
// 使用指针接收者声明的方法
bill.changeEmail("bill@newdomain.com")
bill.notify()

notify接受者是user值的一个副本,notify也可以使用指针调用,Go会在背后执行一个转换操作

1
2
3
// Go在代码背后的执行动作
lisa := &user{"Lisa", "lisa@email.com"}
*(lisa).notify()

可以不到不管是使用值调用,还是使用指针调用,notify函数的接收者都是一个user的副本,对副本的修改并不会影响原来的值
changeEmail恰恰相反,他的接受者是指针,这种情况函数对值进行的修改,会影响到原来的变量值,绑定指针类型的函数,也可以接受值的调用
Go会在背后做如下优化

1
(&bill).changeEmail("bill@newdomain.com")

5.3 类型的本质

一个类型在以参数在函数间传递或者作为接受者绑定方法时,需要根据类型的特点以及使用的方法,去决定是传指针还是传值

5.3.1 内置类型

原始的,内置类型是语言提供的一组类型,诸如数值类型、字符串类型和布尔类型,对于这种类型的传递一般是传值,因为对这些值进行增加或者删除的时候,会创建一个新的值

5.3.2 引用类型

非原始的,引用类型诸如切片、映射、通道、接口和函数类型,每个引用类型包含一组独特的字段,用于管理底层数据。不需要共享一个引用类型的值,可以通过赋值来传递一个引用类型的值的副本,本质上这就是在共享底层数据结构

5.3.3 结构类型

结构类型有可能是原始的,也有可能是非原始的,需要遵守上面内置类型和引用类型的规范。是使用值接受者还是使用指针接受者,不应该由该方法是否修改了接受到的值来决定,应该基于该类型的本质。

5.4 接口

多态是指代码可以根据类型的具体实现采取不同行为的能力,如果一个类型实现了某个接口,所有使用这个接口的地方,都可以支持这种类型的值。

5.4.1 标准库

下面这个程序实现了类似于curl的基本功能,io.Copy的第一个参数是复制到的目标,这个参数是必须实现了io.Writer接口的值,os.Stdout实现了io.Writer。
io.Copy的第二个参数接收一个io.Reader接口类型的值,表示数据流入的源,http.Response.Body实现了io.Reader接口

1
2
3
4
5
6
7
8
9
10
11
12
13
14
15
16
17
18
19
20
21
22
23
24
25
26
27
28
29
30
31
32
package main

import (
"fmt"
"io"
"net/http"
"os"
)

// init is called before main.
func init() {
if len(os.Args) != 2 {
fmt.Println("Usage: ./example2 <url>")
os.Exit(-1)
}
}

// main is the entry point for the application.
func main() {
// Get a response from the web server.
r, err := http.Get(os.Args[1])
if err != nil {
fmt.Println(err)
return
}

// Copies from the Body to Stdout.
io.Copy(os.Stdout, r.Body)
if err := r.Body.Close(); err != nil {
fmt.Println(err)
}
}

5.4.2 实现

接口是用来定义行为的类型。行为通过方法由用户定义的类型实现。用户定义的类型实现了某个接口类型声明的一组方法,那么这个用户定义的类型的值就可以赋给这个接口类型的值。这个赋值会把用户定义的类型的值存入接口类型的值。

对接口值方法的调用会执行接口值里存储的用户定义的类型的值的方法。将自定义类型赋值给接口分两种情况,自定义类型的值赋值给接口值和自定义类型指针赋值给接口值。下面两幅图展示了分别赋值给接口值后接口值的内存布局

值赋值后接口值
指针赋值后接口值

接口值是两个字长度的数据结构,第一个字包含一个指向内部表的指针。内部表叫做iTable,包含了所存储的值的类型信息。iTable包含了已存储的值的类型信息和与这个值相关联的的一组方法。
第二个字是一个指向所存储值的指针。

5.4.3 方法集

方法集定义了接口的接受规则

1
2
3
4
5
6
7
8
9
10
11
12
13
14
15
16
17
18
19
20
21
22
23
24
25
26
27
28
29
30
31
32
33
34
35
36
37
38
39
40
41
42
43
package main

import (
"fmt"
)

// notifier is an interface that defined notification
// type behavior.
type notifier interface {
notify()
}

// user defines a user in the program.
type user struct {
name string
email string
}

// notify implements a method with a pointer receiver.
func (u *user) notify() {
fmt.Printf("Sending user email to %s<%s>\n",
u.name,
u.email)
}

// main is the entry point for the application.
func main() {
// Create a value of type User and send a notification.
u := user{"Bill", "bill@email.com"}

sendNotification(u)

// ./listing36.go:32: cannot use u (type user) as type
// notifier in argument to sendNotification:
// user does not implement notifier
// (notify method has pointer receiver)
}

// sendNotification accepts values that implement the notifier
// interface and sends notifications.
func sendNotification(n notifier) {
n.notify()
}

上面的程序会编译失败,错误的原因是user类型的值并没有实现notify接口。这里涉及到了方法集的概念,方法集定义了一组关联到给定类型的值或指针的方法。
定义方法时使用的接收者的类型决定了这个方法时关联到值还是关联到指针,还是两个都关联。
Go语言规范里定义了方法集的规则。

1
2
3
4
5
6
7
8
9
10

Values Methods Receivers
-----------------------------------------------
T (t T)
*T (t T) and (t *T)

Methods Receivers Values
-----------------------------------------------
(t T) T and *T
(t *T) *T

也就是说T类型的方法集只包含了值接收者声明的方法。而*T的方法集即包含了值接收者声明的方法,也包含指针接受者声明的方法。
那么上面错误代码的解决方式就有两种,一种是sendNotification(&n),因为&n即包含了值接收者方法,也包含了指针接收者方法。另一种是将notify修改为值接收方法。

5.4.4 多态

在了解了方法集的基础上,这里给了一个展示接口的多态行为的例子

1
2
3
4
5
6
7
8
9
10
11
12
13
14
15
16
17
18
19
20
21
22
23
24
25
26
27
28
29
30
31
32
33
34
35
36
37
38
39
40
41
42
43
44
45
46
47
48
49
50
51
52
53
54
package main

import (
"fmt"
)

// notifier is an interface that defines notification
// type behavior.
type notifier interface {
notify()
}

// user defines a user in the program.
type user struct {
name string
email string
}

// notify implements the notifier interface with a pointer receiver.
func (u *user) notify() {
fmt.Printf("Sending user email to %s<%s>\n",
u.name,
u.email)
}

// admin defines a admin in the program.
type admin struct {
name string
email string
}

// notify implements the notifier interface with a pointer receiver.
func (a *admin) notify() {
fmt.Printf("Sending admin email to %s<%s>\n",
a.name,
a.email)
}

// main is the entry point for the application.
func main() {
// Create a user value and pass it to sendNotification.
bill := user{"Bill", "bill@email.com"}
sendNotification(&bill)

// Create an admin value and pass it to sendNotification.
lisa := admin{"Lisa", "lisa@email.com"}
sendNotification(&lisa)
}

// sendNotification accepts values that implement the notifier
// interface and sends notifications.
func sendNotification(n notifier) {
n.notify()
}

可以看到user和admin都实现了notify接口,对同一个行为做出了不同的表示。

5.6 嵌入类型

将已有的类型直接声明在新的结构类型里被称为嵌入类型。通过嵌入类型,与内部类型相关的标识会提升到外部类型上。这些被提升的标识符和直接声明在外部类型里一样。也是外部类型的一部分。

1
2
3
4
5
6
7
8
9
10
11
12
13
14
15
16
17
18
19
20
21
22
23
24
25
26
27
28
29
30
31
32
33
34
35
36
37
38
39
40
41
42
43
package main

import (
"fmt"
)

// user defines a user in the program.
type user struct {
name string
email string
}

// notify implements a method that can be called via
// a value of type user.
func (u *user) notify() {
fmt.Printf("Sending user email to %s<%s>\n",
u.name,
u.email)
}

// admin represents an admin user with privileges.
type admin struct {
user // Embedded Type
level string
}

// main is the entry point for the application.
func main() {
// Create an admin user.
ad := admin{
user: user{
name: "john smith",
email: "john@yahoo.com",
},
level: "super",
}

// We can access the inner type's method directly.
ad.user.notify()

// The inner type's method is promoted.
ad.notify()
}

可以看到user被嵌入到admin中,user的notify方法也被提升到了admin类型上,可以直接调用。如果admin自己也实现了notify接口,这时候user的notify方法不会被提升。

5.6 公开和未公开的标识符

当一个标识符的名字以小写字母开头时,这个标识符就是未公开的,即包外的代码不可见。大写字母开头表示是公开的,对包外的代码可见。

5.7 小结

使用关键字struct或者通过指定已存在的类型,可以声明用户定义的类型
方法提供了一种给用户定义的类型增加行为的方式
设计类型时需要确认类型的本质是原始的还是非原始的
接口是声明了一组行为并支持多态的类型
嵌入类型提供了扩展类型的能力,而无需使用继承
标识符要么是从包里公开的,要么是在包里未公开的

数组、切片和映射-《Go In Action》-Ch4

4.1 数组的内部实现和基础功能

4.1.1 内部实现

长度固定、内存连续分配、CPU数据缓存更久、容易计算索引,迭代速度快

4.2.1 声明和初始化

声明需要类型和长度,长度一旦确定就不能改变

1
var array [5] int

声明变量时,会使用对应类型的零值对变量进行初始化
可以使用字面变量声明数组

1
array := [5]int{10, 20, 30, 40, 50}

也可以使用…替代数组长度,Go会根据初始化时数组元素的数量来确定数组的长度

1
array := [...]int{10, 20, 30, 40, 50}

还可以给指定位置赋值确定值

1
array := [5]int{1: 10, 2: 20}

4.1.3 使用数组

1
2
3
4
5
6
7
8
9
10
11
12
13
14
15
16
17
18
19
20
21
22
23
24
25
26
27
28
29
30
31
32
33
34
35
36
37
38
39
array := [5]int{10, 20, 30, 40, 50}
// 修改索引为2 的元素的值
array[2] = 35

// 声明包含5 个元素的指向整数的数组
// 用整型指针初始化索引为0 和1 的数组元素
array := [5]*int{0: new(int), 1: new(int)}
// 为索引为0 和1 的元素赋值
*array[0] = 10
*array[1] = 20
// 声明第一个包含5 个元素的字符串数组
var array1 [5]string
// 声明第二个包含5 个元素的字符串数组
// 用颜色初始化数组
array2 := [5]string{"Red", "Blue", "Green", "Yellow", "Pink"}
// 把array2 的值复制到array1
array1 = array2

// 声明第一个包含4 个元素的字符串数组
var array1 [4]string
// 声明第二个包含5 个元素的字符串数组
// 使用颜色初始化数组
array2 := [5]string{"Red", "Blue", "Green", "Yellow", "Pink"}
// 将array2 复制给array1
array1 = array2
// Compiler Error:
// cannot use array2 (type [5]string) as type [4]string in assignment

// 声明第一个包含3 个元素的指向字符串的指针数组
var array1 [3]*string
// 声明第二个包含3 个元素的指向字符串的指针数组
// 使用字符串指针初始化这个数组
array2 := [3]*string{new(string), new(string), new(string)}
// 使用颜色为每个元素赋值
*array2[0] = "Red"
*array2[1] = "Blue"
*array2[2] = "Green"
// 将array2 复制给array1
array1 = array2

4.1.4 多维数组

1
2
3
4
5
6
7
8
9
10
11
12
13
14
15
16
17
18
19
20
21
22
23
24
25
26
27
28
29
30
31
32
// 声明一个二维整型数组,两个维度分别存储4 个元素和2 个元素
var array [4][2]int
// 使用数组字面量来声明并初始化一个二维整型数组
array := [4][2]int{{10, 11}, {20, 21}, {30, 31}, {40, 41}}
// 声明并初始化外层数组中索引为1 个和3 的元素
array := [4][2]int{1: {20, 21}, 3: {40, 41}}
// 声明并初始化外层数组和内层数组的单个元素
array := [4][2]int{1: {0: 20}, 3: {1: 41}}

// 声明一个2×2 的二维整型数组
var array [2][2]int
// 设置每个元素的整型值
array[0][0] = 10
array[0][1] = 20
array[1][0] = 30
array[1][1] = 40

// 声明两个不同的二维整型数组
var array1 [2][2]int
var array2 [2][2]int
// 为每个元素赋值
array2[0][0] = 10
array2[0][1] = 20
array2[1][0] = 30
array2[1][1] = 40
// 将array2 的值复制给array1
array1 = array2

// 将 array1 的索引为1 的维度复制到一个同类型的新数组里
var array3 [2]int = array1[1]
// 将外层数组的索引为1、内层数组的索引为0 的整型值复制到新的整型变量里
var value int = array1[1][0]

4.1.5 在函数间传递数组

内存和性能上,传递数组是个很大的开销,因为总是值传递,需要拷贝,可以使用指针在函数间传递大数组,但是传递指针,函数会有改变指针指向的值的权限

1
2
3
4
5
6
7
var array [1e6]int
// 将数组的地址传递给函数foo
foo(&array)
// 函数foo 接受一个指向100 万个整型值的数组的指针
func foo(array *[1e6]int) {
...
}

4.2 切片的内部实现和基础功能

切片类似于动态数组,可以按需自动增长和缩小,通过内置append函数,可以高效增长切片,切片在内存中连续分配,可以索引、迭代

4.2.1 内部实现

三个要素:指向底层数组的指针、切片访问元素的个数(即长度)和切片允许增长到的元素个数(即容量)

4.2.2 创建和初始化

1
2
3
4
5
6
7
8
9
10
11
12
13
14
15
16
17
18
19
20
21
22
23
24
25
26
27
28
29
30
31
32
33
34
35
36
37
// 创建一个字符串切片
// 其长度和容量都是5 个元素
slice := make([]string, 5)
// 创建一个整型切片
// 分别指定长度和容量时,创建的切片,底层数组的长度是指定的容量,但是初始化后并不能访问所有的数组元素 // 这里不能访问最后两个元素
slice := make([]int, 3, 5)

// 容量小于长度的切片会在编译时报错
// 创建一个整型切片
// 使其长度大于容量
slice := make([]int, 5, 3)
// Compiler Error:
// len larger than cap in make([]int)

// 通过切片字面量来声明切片
// 创建字符串切片
// 其长度和容量都是5 个元素
slice := []string{"Red", "Blue", "Green", "Yellow", "Pink"}
// 创建一个整型切片
// 其长度和容量都是3 个元素
slice := []int{10, 20, 30}

// 使用索引声明切片
// 创建字符串切片
// 使用空字符串初始化第100 个元素
slice := []string{99: ""}

// 创建nil 整型切片
// 数组指针为nil,长度和容量都是0
var slice []int

// 声明空切片
// 数组包含0个元素,长度和容量都是0
// 使用make 创建空的整型切片
slice := make([]int, 0)
// 使用切片字面量创建空的整型切片
slice := []int{}

4.2.3 使用切片

1
2
3
4
5
6
7
8
9
10
11
12
13
14
15
16
17
18
19
20
21
22
23
24
25
26
27
28
29
30
31
32
33
34
35
36
37
38
39
40
41
42
43
44
45
46
47
48
49
50
51
52
53
54
55
56
57
58
59
60
61
62
63
64
65
66
67
68
69
70
71
72
73
74
75
76
77
78
79
80
81
82
83
84
85
86
87
88
89
90
91
92
93
94
95
96
97
98
99
// 创建一个整型切片
// 其容量和长度都是5 个元素
slice := []int{10, 20, 30, 40, 50}
// 改变索引为1 的元素的值
slice[1] = 25

// 创建一个整型切片
// 其长度和容量都是5 个元素
slice := []int{10, 20, 30, 40, 50}
// 创建一个新切片
// 其长度为2 个元素,容量为4 个元素
newSlice := slice[1:3]

// 修改切片内容可能导致的结果
// 创建一个整型切片
// 其长度和容量都是5 个元素
slice := []int{10, 20, 30, 40, 50}
// 创建一个新切片
// 其长度是2 个元素,容量是4 个元素
newSlice := slice[1:3]
// 修改newSlice 索引为1 的元素
// 同时也修改了原来的slice 的索引为2 的元素
newSlice[1] = 35

// 表示索引越界的语言运行时错误
// 创建一个整型切片
// 其长度和容量都是5 个元素
slice := []int{10, 20, 30, 40, 50}
// 创建一个新切片
// 其长度为2 个元素,容量为4 个元素
newSlice := slice[1:3]
// 修改newSlice 索引为3 的元素
// 这个元素对于newSlice 来说并不存在
newSlice[3] = 45
// Runtime Exception:
// panic: runtime error: index out of range

// 切片增长
// 创建一个整型切片
// 其长度和容量都是5 个元素
slice := []int{10, 20, 30, 40, 50}
// 创建一个新切片
// 其长度为2 个元素,容量为4 个元素
newSlice := slice[1:3]
// 使用原有的容量来分配一个新元素
// 将新元素赋值为60
// 注意此时 slice变为:{10, 20, 30, 60, 50}
// append时如果容量有剩余,会在现有数组上增加元素,如果容量没有剩余,会创建一个新的数组,并想现有值复制到新的数组上
// 当切片容量小于1000时,每次扩展成倍增加,一旦元素超过1000,容量银子会设为1.25,也就是每次增加25%
newSlice = append(newSlice, 60)

// 创建切片时的3个索引
// 创建字符串切片
// 其长度和容量都是5 个元素
source := []string{"Apple", "Orange", "Plum", "Banana", "Grape"}
// 将第三个元素切片,并限制容量
// 其长度为1 个元素,容量为2 个元素
slice := source[2:3:4]
// 这比可用的容量大
slice := source[2:3:6]
// Runtime Error:
// panic: runtime error: slice bounds out of range

// 3个索引一旦长度和容量设置的不一样,新的切片和原始切片公用相同的底层数组,对新切片的append会影响到原始切片,很容发生莫名其妙的问题,
// 此时可将新切片的容量设置为和长度一样,再执行append的时候,就会创建新的底层数组,从而和原始切片脱离关系,可以放心修改
// 创建字符串切片
// 其长度和容量都是5 个元素
source := []string{"Apple", "Orange", "Plum", "Banana", "Grape"}
// 对第三个元素做切片,并限制容量
// 其长度和容量都是1 个元素
slice := source[2:3:3]
// 向slice 追加新字符串
slice = append(slice, "Kiwi")

// 将一个切片追加到另一个切片
// ...运算符,可以将一个切片的所有元素追加到另一个切片里
s1 := []int{1, 2}
s2 := []int{3, 4}
// 将两个切片追加在一起,并显示结果
fmt.Printf("%v\n", append(s1, s2...))
Output:
[1 2 3 4]

// 迭代切片for range
// 关键字range 会返回两个值。第一个值是当前迭代到的索引位置,第二个值是该位置对应元素值的一份副本
// 需要强调的是,range 创建了每个元素的副本,而不是直接返回对该元素的引用
// 创建一个整型切片
// 其长度和容量都是4 个元素
slice := []int{10, 20, 30, 40}
// 迭代每个元素,并显示值和地址
for index, value := range slice {
fmt.Printf("Value: %d Value-Addr: %X ElemAddr: %X\n",
value, &value, &slice[index])
}
// Output:
// Value: 10 Value-Addr: 10500168 ElemAddr: 1052E100
// Value: 20 Value-Addr: 10500168 ElemAddr: 1052E104
// Value: 30 Value-Addr: 10500168 ElemAddr: 1052E108
// Value: 40 Value-Addr: 10500168 ElemAddr: 1052E10C

4.2.4 多维切片

1
2
3
4
// 创建一个整型切片的切片
slice := [][]int{{10}, {100, 200}}
// 为第一个切片追加值为20 的元素
slice[0] = append(slice[0], 20)

4.2.5 在函数间传递切片

1
2
3
4
5
6
7
8
9
10
// 成本很低,在 64 位架构的机器上,一个切片需要24 字节的内存:指针字段需要8 字节,长度和容量
字段分别需要8 字节。
slice := make([]int, 1e6)
// 将slice 传递到函数foo
slice = foo(slice)
// 函数foo 接收一个整型切片,并返回这个切片
func foo(slice []int) []int {
...
return slice
}

4.3 映射的内部实现和基础功能

4.3.1 内部实现

桶 + 两个数组
key转换成散列值,散列低位表示桶的序号,每个桶内有两个数组构成,第一个数组存储散列键的高发位置,第二个数组是一个字节数组,用于存储键值对,该字节数组先依次存储了这个桶里的所有键,
之后依次存储了这个桶里的所有值。

映射的内部结构的简单表示

4.3.2 创建和初始化

映射的键可以是任何可以使用(==)比较的值,切片、函数以及包含切片的结构类型不能作为映射的键,因为他们包含引用语义

1
2
3
4
5
6
7
8
9
10
// 创建一个映射,键的类型是string,值的类型是int
dict := make(map[string]int)
// 创建一个映射,键和值的类型都是string
// 使用两个键值对初始化映射
dict := map[string]string{"Red": "#da1337", "Orange": "#e95a22"}

// 创建一个映射,使用字符串切片作为映射的键
dict := map[[]string]int{}
// Compiler Exception:
// invalid map key type []string

4.3.3 使用映射

1
2
3
4
5
6
7
8
9
10
11
12
13
14
15
16
17
18
19
20
21
22
23
24
25
26
27
28
29
30
31
32
33
34
35
36
37
38
39
40
41
42
43
44
45
46
47
48
// 创建一个空映射,用来存储颜色以及颜色对应的十六进制代码
colors := map[string]string{}
// 将Red 的代码加入到映射
colors["Red"] = "#da1337"

// 通过声明映射创建一个nil 映射, 可以通过声明一个未初始化的映射来创建一个值为nil 的映射(称为nil 映射)。nil 映射
// 不能用于存储键值对,否则,会产生一个语言运行时错误
var colors map[string]string
// 将Red 的代码加入到映射
colors["Red"] = "#da1337"
// Runtime Error:
// panic: runtime error: assignment to entry in nil map

// 从映射获取值并判断键是否存在
// 获取键Blue 对应的值
value, exists := colors["Blue"]
// 这个键存在吗?
if exists {
fmt.Println(value)
}

// 从映射获取值,并通过该值是否为零值来判断键是否存在
// 获取键Blue 对应的值
value := colors["Blue"]
// 这个键存在吗?
if value != "" {
fmt.Println(value)
}

// 遍历for range
// 创建一个映射,存储颜色以及颜色对应的十六进制代码
colors := map[string]string{
"AliceBlue": "#f0f8ff",
"Coral": "#ff7F50",
"DarkGray": "#a9a9a9",
"ForestGreen": "#228b22",
}
// 显示映射里的所有颜色
for key, value := range colors {
fmt.Printf("Key: %s Value: %s\n", key, value)
}

// 删除键为Coral 的键值对
delete(colors, "Coral")
// 显示映射里的所有颜色
for key, value := range colors {
fmt.Printf("Key: %s Value: %s\n", key, value)
}

4.3.4 在函数间传递映射

在函数间传递映射并不会制造出该映射的副本,实际上,当传递映射给一个函数,并对这个映射做了修改时,所有对这个映射的引用都会察觉到这个修改,和切片类似

1
2
3
4
5
6
7
8
9
10
11
12
13
14
15
16
17
18
19
20
21
22
23
24
25
26
27
28
29
30
31
32
func main() {
// 创建一个映射,存储颜色以及颜色对应的十六进制代码
colors := map[string]string{
"AliceBlue": "#f0f8ff",
"Coral": "#ff7F50",
"DarkGray": "#a9a9a9",
"ForestGreen": "#228b22",
}
// 显示映射里的所有颜色
for key, value := range colors {
fmt.Printf("Key: %s Value: %s\n", key, value)
}
// 调用函数来移除指定的键
removeColor(colors, "Coral")
// 显示映射里的所有颜色
for key, value := range colors {
fmt.Printf("Key: %s Value: %s\n", key, value)
}
}
// removeColor 将指定映射里的键删除
func removeColor(colors map[string]string, key string) {
delete(colors, key)
}

// output
// Key: AliceBlue Value: #F0F8FF
// Key: Coral Value: #FF7F50
// Key: DarkGray Value: #A9A9A9
// Key: ForestGreen Value: #228B22
// Key: AliceBlue Value: #F0F8FF
// Key: DarkGray Value: #A9A9A9
// Key: ForestGreen Value: #228B22

4.4 小结

数组是构造切片和映射的基石
Go语言里切片经常用来处理数据的集合,映射用来处理具有键值对结构的数据
内置函数make可以创建切片和映射,并指定原始的长度和容量,也可以直接使用切片和映射字面量,或者使用字面量作为变量的初始值
切片有容量限制,不过可以使用内置的append函数扩展容量
映射的增长没有容量或者任何限制
内置函数len可以用来获取切片或者映射的长度
内置函数cap只能用于切片
通过组合,可以创建多维数组和多维切片。也可以使用切片或者其他映射作为映射的值,但是切片不能用作映射的键
将切片或者映射传递给函数的成本很小,并且不会复制底层的数据结构

打包和工具链-《Go In Action》-Ch3

3.1 包

对于所有的.go文件,都应该在首行声明自己所属的包,每个包在一个单独的目录中,不能把多个包放在一个目录中,也不能把相同的包拆分到不同的目,同一个包下的所有
.go文件必须声明同一个包名

包命名惯例,简洁,顾名思义

main包是特殊的包,编译程序会将带有main包声明的包编译为二进制可执行文件,main包中一定要有main函数,否则不可以创建可执行文件

3.2 导入

导入包查找顺序 GOROOT -》 GOPATH,一旦编译器找到一个满足的包就会停止查找,也可以远程导入包,通过go get 将GitHub的包下载到本地

1
2
3
4
5
import (
"fmt"
"strings"
"github.com/spf13/viper"
)

如果包重名,可以使用命名导入,将导入的包命名为新名字

1
2
3
4
5
6
7
8
9
10
11
package main

import (
"fmt"
myfmt "mylib/fmt"
)

func main() {
fmt.Println("Standard Library")
myfmt.Println("mylib/fmt")
}

如果导入了不在代码使用的包,会导致编译失败,可以使用下划线来重命名不适用的包

3.3 函数init

每个包可以包含任意多个init函数,在main之前被调用,init函数用在设置包、初始化变量或者其他要在程序运行前优先完成的引导工作,可以使用下划线来重命名不适用的包
以数据库驱动为例,sql包在编译时并不知道要注册哪些驱动,如果我们要使用数据库连接,就需要用init函数将驱动注册到mysql上

1
2
3
4
5
6
7
8
9
package postgres

import (
"database/sql"
)

func init() {
sql.Register("postgres", new(PostgresDriver))
}

在使用这个新的数据库驱动时,需要使用空白标识符导入包

1
2
3
4
5
6
7
8
9
10
package main

import (
"database/sql"
_ "github.com/goinaction/code/chapter3/dbdriver/postgres"
)

func main() {
sql.Open("postgres", "mydb")
}

3.4 使用Go的工具

go build 执行编译
参数为空时 默认编译当前目录
参数可以为文件名
参数可以为/… 会编译目录下的所有包

go clean 执行清理,会删除可执行文件
go run 先构建再执行

3.5 进一步介绍Go开发工具

go vet 检测代码常见错误 printf类型匹配错误参数 方法签名错误 错误的结构标签 没有指定字段名的结构字面量
go fmt 格式化代码
go doc 打印文档
godoc 浏览器打开文档 godoc -http:6000

3.7 依赖管理

没有实际管理过一个大工程,这里看的稀里糊涂的,暂时不表了,等搞清楚再补

3.8 小结

Go语言中包是组织代码的基本单位
环境变量GOPATH决定了GO源代码在磁盘上被保存、编译和安装的位置
可以为每个工程设置不同的GOPATH,以保持源代码和依赖的隔离
go工具是在命令行上工作的最好工具
开发人员可以使用go get获取别人的包并将其安装到自己的GOPATH指定的目录
想要为别人创建包很见到,只要把源代码放到共有代码库,把那个遵守一些简单的规则就可以了
GO语言在设计时将分享代码作为语言的核心特性和驱动力
推荐使用依赖管理工具来管理依赖
有很多社区开发的依赖管理工具,godep、vendor、gb

快速开始一个GO程序-《Go In Action》-Ch2

一上来接来个大程序,新手能接得住么
这个程序从不同的数据源拉取数据,将数据内容与一组搜索项做对比,然后将匹配的内容显示在终端窗口。这个程序会读取文本文件,
进行网络调用,解码XML 和JSON 成为结构化类型数据,并且利用Go 语言的并发
机制保证这些操作的速度source code

2.1 程序架构

1
2
3
4
5
6
7
8
9
10
11
- sample
- data
data.json -- 包含一组数据源
- matchers
rss.go -- 搜索 rss 源的匹配器
- search
default.go -- 搜索数据用的默认匹配器
feed.go -- 用于读取 json 数据文件
match.go -- 用于支持不同匹配器的接口
search.go -- 执行搜索的主控制逻辑
main.go -- 程序的入口

2.2 main 包

1
2
3
4
5
6
7
8
9
10
11
12
13
14
15
16
17
18
19
20
21
package main

import (
"log"
"os"

_ "github.com/goinaction/code/chapter2/sample/matchers"
"github.com/goinaction/code/chapter2/sample/search"
)

// init is called prior to main.
func init() {
// Change the device for logging to stdout.
log.SetOutput(os.Stdout)
}

// main is the entry point for the program.
func main() {
// Perform the search for the specified term.
search.Run("president")
}

有以下几点需要注意:

  • main()是程序的入口,没有main函数,构建程序不会生成可执行文件
  • 一个包定义一组编译通过的代码,包的名字类似命名空间,可以用来直接访问包内生命的标识符, 可以报不同包中定义的同名标识符区别开
  • 下划线开头的包,是为了进行包的初始化操作,GO不允许声明导入包却不使用,下划线让编译器接受这种到日,并且调用对应包内所有文件代码里定义的init函数,init函数的执行在main函数之前

2.3 search 包

serach 包包含了程序使用的框架和业务逻辑

2.3.1 serach.go

serach文件先获取数据源,然后对每个数据源获取的数据进行匹配,每一个匹配启用一个goroutine。使用sync.WaitGroup控制任务是否完成。
sync.WaitGroup是一个计数信号量,主要有三个方法Add、Done和Wait,每增加一个任务就Add一次,每完成一个任务就Done一次,调用Wait的时候程序会阻塞,直到所有任务完成。

1
2
3
4
5
6
7
8
9
10
11
12
13
14
15
16
17
18
19
20
21
22
23
24
25
26
27
28
29
30
31
32
33
34
35
36
37
38
39
40
41
42
43
44
45
46
47
48
49
50
51
52
53
54
55
56
57
58
59
60
61
62
63
64
65
66
67
68
69
70
package search

//从标准库导入代码时,只需要给出要导入包的包名,
//编译器查找包时,总是会到GOROOT和GOPATH环境变量引用的位置去查找
import (
"log"
"sync"
)

// A map of registered matchers for searching.
// 小写字母标识,标识包内变量,不导出 or 不公开
var matchers = make(map[string]Matcher)

// Run performs the search logic.
func Run(searchTerm string) {
// Retrieve the list of feeds to search through.
feeds, err := RetrieveFeeds()
if err != nil {
log.Fatal(err)
}

// Create an unbuffered channel to receive match results to display.
results := make(chan *Result)

// Setup a wait group so we can process all the feeds.
var waitGroup sync.WaitGroup

// Set the number of goroutines we need to wait for while
// they process the individual feeds.
waitGroup.Add(len(feeds))

// Launch a goroutine for each feed to find the results.
for _, feed := range feeds {
// Retrieve a matcher for the search.
matcher, exists := matchers[feed.Type]
if !exists {
matcher = matchers["default"]
}

// Launch the goroutine to perform the search.
go func(matcher Matcher, feed *Feed) {
Match(matcher, feed, searchTerm, results)
waitGroup.Done()
}(matcher, feed)
}

// Launch a goroutine to monitor when all the work is done.
go func() {
// Wait for everything to be processed.
waitGroup.Wait()

// Close the channel to signal to the Display
// function that we can exit the program.
close(results)
}()

// Start displaying results as they are available and
// return after the final result is displayed.
Display(results)
}

// Register is called to register a matcher for use by the program.
func Register(feedType string, matcher Matcher) {
if _, exists := matchers[feedType]; exists {
log.Fatalln(feedType, "Matcher already registered")
}

log.Println("Register", feedType, "matcher")
matchers[feedType] = matcher
}

对于上面代码,有以下问题需要明确下:

  • feeds, err := RetrieveFeeds() 这种一个函数返回两个值,第一个参数返回值,第二个返回错误信息,是GO中常用的模式
  • 声明运算符(:=),这个运算符在声明变量的同时,给变量赋值
  • feeds 是一个切片,可以理解为Go里面的动态数组,是一种引用类型
  • results是一个无缓冲的channel,和map、slice一样,都是引用类型,channel内置同步机制,从而保证通信安全
  • Go中,如果main函数返回,整个程序也就终止了,终止时,会关闭所有之前启动而且还在运行的goroutine
  • for range对feeds切片做迭代,和python里面的 for in一样的道理,每次迭代会返回两个值(index,value),value是一个副本,下划线_是一个占位符
  • 使用go关键字启动一个goroutine,并对这个goroutine做并发调度。上面程序中go启动了一个匿名函数作为goroutine
  • 在Go语言中,所有的变量都是以值的方式传递。所以想要修改真正的值,可以传递指针
  • Go语言支持闭包,匿名函数中访问searchTerm、results就是通过闭包的形势访问的。注意matcher、feed这两个变量并没有使用闭包的形式访问

2.3.2 feed.go

feed会从本地的data/data.json中读取Json数据,并将数据反序列化为feed切片,defer会安排随后的函数调用在函数返回时才执行, 使用defer可以缩短打开文件和关闭文件的代码间隔

1
2
3
4
5
6
7
8
9
10
11
12
13
14
15
16
17
18
19
20
21
22
23
24
25
26
27
28
29
30
31
32
33
34
35
36
package search

import (
"encoding/json"
"os"
)

const dataFile = "data/data.json"

// Feed contains information we need to process a feed.
type Feed struct {
Name string `json:"site"`
URI string `json:"link"`
Type string `json:"type"`
}

// RetrieveFeeds reads and unmarshals the feed data file.
func RetrieveFeeds() ([]*Feed, error) {
// Open the file.
file, err := os.Open(dataFile)
if err != nil {
return nil, err
}

// Schedule the file to be closed once
// the function returns.
defer file.Close()

// Decode the file into a slice of pointers
// to Feed values.
var feeds []*Feed
err = json.NewDecoder(file).Decode(&feeds)

// We don't need to check for errors, the caller can do this.
return feeds, err
}

2.3.3 match.go/default.go

1
2
3
4
5
6
7
8
9
10
11
12
13
14
15
package search

// defaultMatcher implements the default matcher.
type defaultMatcher struct{}

// init registers the default matcher with the program.
func init() {
var matcher defaultMatcher
Register("default", matcher)
}

// Search implements the behavior for the default matcher.
func (m defaultMatcher) Search(feed *Feed, searchTerm string) ([]*Result, error) {
return nil, nil
}

func (m defaultMatcher) Search 意味着search和defaultMatcher的值绑定在了一起,我们可以使用defaultMatcher 类型的值或者指向这个类型值的指针来调用Search 方
法。无论我们是使用接收者类型的值来调用这个方,还是使用接收者类型值的指针来调用这个
方法,编译器都会正确地引用或者解引用对应的值,作为接收者传递给Search 方法

1
2
3
4
5
6
7
8
9
10
11
12
// 方法声明为使用defaultMatcher 类型的值作为接收者
func (m defaultMatcher) Search(feed *Feed, searchTerm string)
// 声明一个指向defaultMatcher 类型值的指针
dm := new(defaultMatch)
// 编译器会解开dm 指针的引用,使用对应的值调用方法
dm.Search(feed, "test")
// 方法声明为使用指向defaultMatcher 类型值的指针作为接收者
func (m *defaultMatcher) Search(feed *Feed, searchTerm string)
// 声明一个defaultMatcher 类型的值
var dm defaultMatch
// 编译器会自动生成指针引用dm 值,使用指针调用方法
dm.Search(feed, "test")

与直接通过值或者指针调用方法不同,如果通过接口类型的值调用方法,规则有很大不同,
如代码清单2-38 所示。使用指针作为接收者声明的方法,只能在接口类型的值是一个指针的时
候被调用。使用值作为接收者声明的方法,在接口类型的值为值或者指针时,都可以被调用。

1
2
3
4
5
6
7
8
9
10
11
12
13
14
15
16
// 方法声明为使用指向defaultMatcher 类型值的指针作为接收者
func (m *defaultMatcher) Search(feed *Feed, searchTerm string)
// 通过interface 类型的值来调用方法
var dm defaultMatcher
var matcher Matcher = dm // 将值赋值给接口类型
matcher.Search(feed, "test") // 使用值来调用接口方法
> go build
cannot use dm (type defaultMatcher) as type Matcher in assignment
// 方法声明为使用defaultMatcher 类型的值作为接收者
func (m defaultMatcher) Search(feed *Feed, searchTerm string)
// 通过interface 类型的值来调用方法
var dm defaultMatcher
var matcher Matcher = &dm // 将指针赋值给接口类型
matcher.Search(feed, "test") // 使用指针来调用接口方法
> go build
Build Successful

match创建不同类型的匹配器,Matcher其实是一个接口,对于每种匹配器又有不同的具体实现。
下面的代码中,Matcher接口定义了一个Search方法,每个实现了Search方法的类型都实现了Matcher接口

1
2
3
4
5
6
7
8
9
10
11
12
13
14
15
16
17
18
19
20
21
22
23
24
25
26
27
28
29
30
31
32
33
34
35
36
37
38
39
40
41
42
43
package search

import (
"log"
)

// Result contains the result of a search.
type Result struct {
Field string
Content string
}

// Matcher defines the behavior required by types that want
// to implement a new search type.
type Matcher interface {
Search(feed *Feed, searchTerm string) ([]*Result, error)
}

// Match is launched as a goroutine for each individual feed to run
// searches concurrently.
func Match(matcher Matcher, feed *Feed, searchTerm string, results chan<- *Result) {
// Perform the search against the specified matcher.
searchResults, err := matcher.Search(feed, searchTerm)
if err != nil {
log.Println(err)
return
}

// Write the results to the channel.
for _, result := range searchResults {
results <- result
}
}

// Display writes results to the console window as they
// are received by the individual goroutines.
func Display(results chan *Result) {
// The channel blocks until a result is written to the channel.
// Once the channel is closed the for loop terminates.
for result := range results {
log.Printf("%s:\n%s\n\n", result.Field, result.Content)
}
}

Display方法会迭代results这个channel,有数据时会打印,没数据时会阻塞,当main.go中的close(result)后,for range循环结束

注意到default.go有init函数,这个函数会在main中通过下划线导入包的时候执行,init的功能是初始化匹配器

2.4 RSS 匹配器

rss.go篇幅过长,这里不贴代码了,其中有几个关注的点说下:
在init中注册了一个rssMatcher,这个match和之前的defaultMatcher一样,绑定了Search方法,即实现了Matcher接口

1
2
3
4
func init() {
var matcher rssMatcher
search.Register("rss", matcher)
}

rss.go主要有两个方法retrieve和Search,retrieve负责抓取网略资源,search负责匹配,具体匹配方法这里不表了

2.5 小结

  • 每个代码文件都属于一个包,而包名应该与代码文件所在的文件夹同名。
  • Go 语言提供了多种声明和初始化变量的方式。如果变量的值没有显式初始化,编译器会将变量初始化为零值。
  • 使用指针可以在函数间或者goroutine 间共享数据。
  • 通过启动goroutine 和使用通道完成并发和同步。
  • Go 语言提供了内置函数来支持Go 语言内部的数据结构。
  • 标准库包含很多包,能做很多很有用的事情。
  • 使用Go 接口可以编写通用的代码和框架。

关于go语言的介绍-《Go In Action》-Ch1

1.1 Go 解决现代编程的难题

1.1.1 开发速度

更加智能的编译器,简化依赖算法,编译速度更快,只会关注直接被引用的库
编译器提供类型检查

1.1.2 并发

提供并发支持,goroutine比线程更轻量级的并发,内置channel,在不同goroutine之间通信

1.goroutine

goroutine是可以和其他goroutine并行执行的函数,使用的内存更少。运行时会自动的配置一组逻辑处理器执行goroutine,每个逻辑处理器绑定到一个操作系统线程上,程序实行效率更高

1
2
3
4
func log(msg string) {
....
}
go log("blablabla")

2.channel

channel是可以让goroutine之间进行安全通信的工具,避免共享内存访问的问题,保证同一时刻只会有一个goroutine修改数据, 但是channel并不提供跨goroutine的数据访问保护机制,
如果传输的是副本,那么每个goroutine都持有一个副本,各自对副本修改是安全的。但是如果传输的诗指针时,还是需要额外的同步动作

1.1.3 Go语言的类型系统

无继承,使用组合设计模式,具有接口机制对行为进行建模

1. 类型简单

内置简单类型,支持自定义类型,使用组合来支持扩展

2.Go接口对一组行为建模

一个类型实现了一个接口的所有方法,那么这个类型的实例就可以存储在这个接口类型的实例中,不需要额外声明
Go语言的整个网络库都是用了io.Reader接口,这样可以将程序的功能和不同的网络实现分离,任何实现了open方法的类型,都实现了io.Reader接口

1
2
3
4
//io.Reader
type Reader interface{
Read(p []byte) (n int, err error)
}

1.1.3 内存管理

Golang提供GC

1.2 Hello Go

1
2
3
4
5
package main
import "fmt"
func main() {
fmt.Println("Hello World")
}

Go Playground是提供在线编辑运行Go的网站

Your browser is out-of-date!

Update your browser to view this website correctly. Update my browser now

×